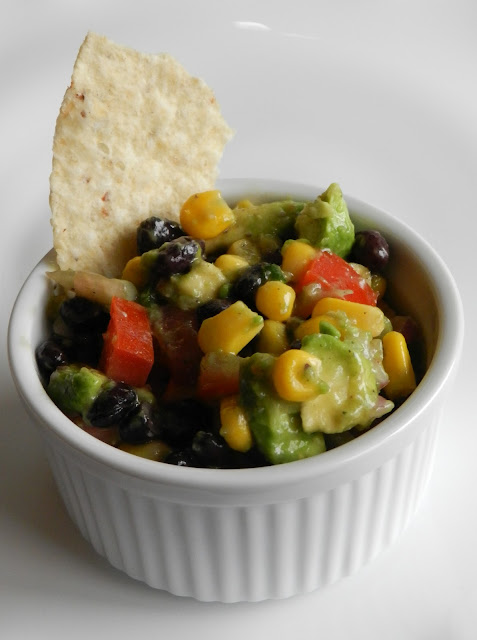
Summertime Dip
This dip is so good that I planned to make it twice in one week. The grocery store had avocados on sale, so I happily stocked up. I bought two very ripe avocados to make this dip for a party the next day, and two green avocados for another batch a few days later. The checkout clerk scanned the ripe ones first, and then grabbed the unripe ones and said, "Those are rock-hard!" and I said, "Oh, those avocados are for later." His eyes got awkwardly wide as he said, "WHOA," and I realized I'd accidentally creeped this poor kid out.
My friend Tavia, who could never creep anyone out, even on purpose, brought a huge bowl of this dip to a work party, and I immediately demanded the recipe. She knew it was good because she also brought a dozen copies of the recipe. I knew it was good because--brace yourself--I chose to eat seconds of this instead of eating cake.
Avocados can be tricky, but here's how I deal with them. Select ripe avocados--the skin should be brownish green, and the flesh should yield a little if you press a finger into it. You can also test for ripeness by flicking the nubbin of the stem end (the narrow side) of the avocado. If the nubbin detaches from the fruit easily, the avocado is ready to be eaten! The other tricky part is prepping it. Slice it along its length, around the pit, and twist the halves apart. Then gently whack a knife just a little into the pit, and twist it as you pull it out of the fruit. Use your thumb to carefully dislodge the pit. (The less you stick the knife in the pit, the easier it'll be to dislodge it.)
To dice it, cut through the fruit to the skin in a crosshatch pattern.
Use a spoon or spatula to scoop the diced avocado out.
Now get excited, because this dip is so good, you'll accidentally blurt out shady innuendos to underage cashiers!
Black Bean, Avocado, and Corn Dip
15 oz sweet whole-kernel corn (I use frozen fire-roasted corn from Trader Joe's that I thaw at room temperature)
15 oz black beans*
2 tomatoes, seeded and diced (Roma or Tesoro work very well, as they don't have much liquid)
2 avocados, diced
3 green onions (scallions), sliced very thinly
1 small red onion, diced
1/4 c. olive oil
1/4 c. red wine vinegar
1 package (2/3-oz) package of Good Seasonings Italian dressing mix
In a large glass or plastic bowl, mix together corn, beans, tomatoes, avocados, scallions, and the onion. In a small bowl or large glass, whisk together red wine vinegar, olive oil, and dressing mix. Pour dressing into the large bowl, mixing to coat. Cover and refrigerate at least eight hours before serving to allow flavors to marry. Serve with tortilla chips. (The scoops are particularly well-suited for this dip.)
*As I've mentioned before, I avoid canned foods as much as possible. I buy dried beans in bulk and cook them in large batches using the quick-soak method (described below). I drain and rinse what's needed for my current recipe and freeze the rest. Besides yielding more delicious beans, cooking dried beans is more than 50 percent cheaper than using canned beans, but saving money isn't my only concern. Food cans (not just those for beans) may pose a serious health risk. The Environmental Working Group says: "No matter what brand you use or where you buy your canned food, the cans are almost certainly lined with an epoxy resin that contains BPA...Because of the high temperatures used in the canning process, your potential exposure to BPA from canned food is much higher than your potential exposure from plastic water bottles."
Beans: Quick-Soak Cooking Method
Adapted from How To Cook Everything
Put the beans in a large pot that has a tight-fitting lid. Cover the beans with about two or three inches of cold water. Put the pot, uncovered, over high heat and bring to a boil. Boil the beans for two minutes, then turn off the heat and cover the pot. Let the beans soak for two hours.
Taste a bean--if it's tender (it won't be done yet, but if it yields a bit), add a large pinch of salt and a few grinds of black pepper. (If the bean isn't tender yet, hold off on the salt and pepper for now. Keep checking on the tenderness, and add the salt and pepper when the beans start yielding more.) Add some more water to cover the beans by an inch or two.
Bring the pot to a boil again, and then adjust the heat until it's gently bubbling. Partially cover the beans, and test for doneness every 10 or 15 minutes. Remove from the heat when the beans are to your liking. You can drain them for immediate use, or keep them in the fridge or freezer with some of their cooking liquid.
(The time required for cooking varies depending on the type of bean. White beans and black beans take 45-60 minutes; chickpeas take 90 minutes or more. Stay tuned for a slow-cooker method for cooking chickpeas!)


Awesome stuff. I think next time I'll throw in one more avocado. Also, I threw in a good handful of chopped Italian parsley (mainly, because I had it).
ReplyDelete